When it comes to interior finishing, few elements can elevate the aesthetic appeal and perceived quality of a space quite like finish trim. This crucial component, often understated, provides the final touch that transforms mere construction into a polished, cohesive design. Whether you’re a homeowner undertaking a renovation, a professional contractor, or an interior designer, understanding the intricacies of finish trim—from material selection to installation techniques—can significantly influence the success of your project.
In this comprehensive guide, we will explore the many facets of finish trim, including its styles, installation processes, finishing techniques, and maintenance tips. We’ll delve into practical insights, expert advice, and actionable steps to help you select and install high-quality finish trim that elevates your home’s interior aesthetic. For those interested in beginning their journey with confidence, you can learn more about professional finish trim services at Finish trim and discover how experienced craftsmanship can make all the difference.
Understanding Finish Trim and Its Role in Home Design
What Is Finish Trim and Why Is It Important?
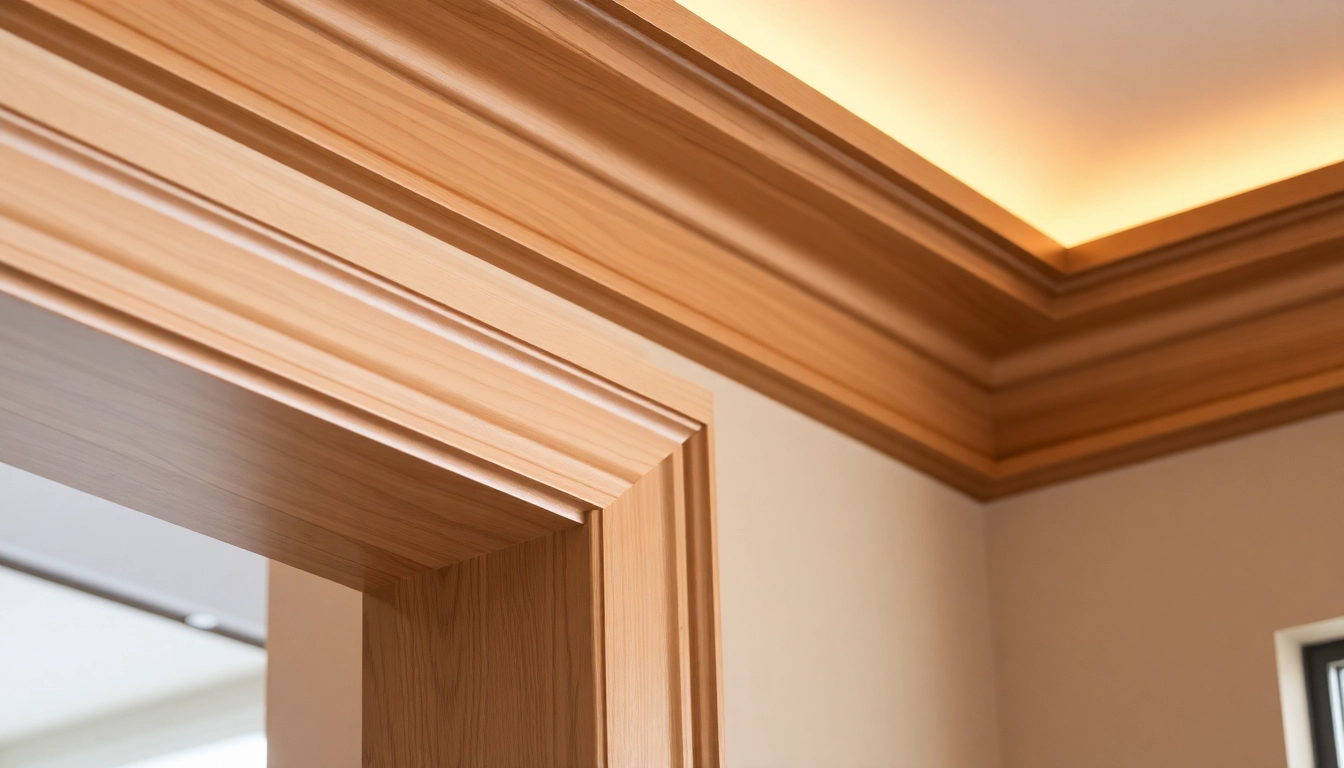
Finish trim encompasses the woodwork and mouldings installed at the final stages of interior finishing to conceal gaps, cover rough edges, and define architectural features. Typically made from wood, MDF, or composite materials, finish trim includes baseboards, crown moldings, door casings, window trims, and chair rails, among others. Its primary purpose is to provide a seamless transition between surfaces, enhance aesthetic appeal, and contribute to a room’s overall style.
Beyond mere decoration, finish trim plays a functional role in protecting walls and floors from damage, framing windows and doors for a neat appearance, and adding character through stylistic variations. Properly chosen and installed finish trim reflects craftsmanship, attention to detail, and a cohesive design philosophy. It is the “finishing touch” that ties a space together, making it feel complete and custom-crafted rather than generic or unfinished.
Common Types of Finish Trim and Styles
Finish trim comes in various profiles, styles, and materials, each suited to different architectural contexts and personal preferences. Here are some of the most prevalent types:
- Baseboards: Installed at the junction of walls and floors, baseboards refine the transition and hide imperfections. Styles range from simple flats to ornate profiles with intricate mouldings.
- Crown Molding: Fitted along the ceiling line, crown molding adds elegance and height perception. It comes in traditional, modern, and decorative styles.
- Door Casings and Window Trims: These trim pieces frame openings, providing a polished look. They vary from minimalist designs to elaborate profiles with layered mouldings.
- Chair Rails: Positioned horizontally on walls, chair rails protect walls from furniture damage and serve as decorative elements.
- Picture Rails and Wainscoting: These add architectural interest and can be styled to match traditional or contemporary settings.
Styles span from colonial and craftsman to modern minimalist, allowing homeowners and designers to tailor the character of each space. Choosing the right style depends on the overall architectural style, interior decor, and personal taste.
How Finish Trim Elevates Interior Aesthetics
Properly selected and installed finish trim elevates visual harmony and embodies craftsmanship. It adds dimension, contrasting textures, and intricate details that draw the eye and create a sense of depth. For example:
- Matching trim profiles with architectural features ensures cohesion—like pairing flat baseboards with sleek Modern interiors or detailed crown moldings in traditional settings.
- High-quality materials and precise cuts result in clean lines and seamless joints, reflecting professionalism and attention to detail.
- Color and finish choices, such as paint, stain, or clear coats, can highlight the natural beauty of wood or complement wall colors, adding warmth or contrast as desired.
In essence, finish trim functions as both a decorative framework and a subtle unifier, making every detail feel intentional and refined.
Choosing the Right Finish Trim for Your Space
Materials and Wood Options for Finish Trim
The choice of materials directly impacts durability, appearance, installation ease, and cost. Common options include:
- Solid Wood: Offers a premium look with natural grain variations. Hardwoods like oak, maple, cherry, or mahogany provide durability and a high-end finish.
- MDF (Medium Density Fiberboard): Cost-effective, smooth, and easy to paint, MDF is popular for painted trim. It’s less resistant to moisture but works well indoors.
- PVC or Vinyl: Ideal for areas prone to moisture, such as bathrooms or kitchens, with maintenance-free properties.
- Composite Materials: Combining wood and resin, these are durable and resistant to pests and warping.
Your choice hinges on the specific application environment, budget constraints, and aesthetic goals. For example, hardwood trim enhances traditional luxury settings, while MDF suits modern painted interiors.
Matching Trim Styles with Architectural Elements
Selecting trim style involves harmonizing with your home’s architecture. Here are some tips:
- Colonial and Victorian Styles: Favor intricate mouldings, layered profiles, and decorative corners.
- Craftsman and Bungalow: Emphasize simple, sturdy profiles with clean lines and natural wood finishes.
- Modern and Contemporary: Opt for minimalistic, flat trims with sharp edges and smooth surfaces.
- Classic Elegance: Use ornate crown moldings and detailed casing to evoke sophistication.
Matching the complexity of your trim with your architectural style ensures harmony and avoids visual dissonance.
Factors Influencing Color and Finish Choices
The color and finish of your trim significantly affect the room’s tone. Consider the following:
- Painted Finish: Versatile for any style; choices include matte, semi-gloss, or high-gloss sheens. Light-colored trims can enlarge spaces, while darker hues add contrast and drama.
- Stained Natural Wood: Highlights grain patterns, adding warmth and richness. Suitable for craftsman or rustic themes.
- Clear Sealants or Lacquers: Protect natural wood while maintaining its appearance. Often used for ceiling moldings or intricate profiles.
Lighting conditions, wall colors, and furniture styles influence color close matches or contrasting choices. Always test samples before final application.
Step-by-Step Guide to Installing Finish Trim
Preparation and Measurement Best Practices
Accurate measurement and preparation are the foundations of a successful finish trim project. Follow these steps:
- Plan and Layout: Sketch your room’s trim design, noting lengths and angles. Use detailed plans for each type of trim.
- Gather Tools and Materials: Essential tools include miter saw, measuring tape, level, nail gun or hammer, clamps, and finish nails. Prepare your chosen trim materials.
- Measure Precisely: Measure wall lengths carefully, accounting for door and window openings, allowances for miter cuts, and expansion gaps.
- Mark and Cut: Use a miter saw to cut corners and joints at precise angles—typically 45°—for seamless miters. Test fit before fastening.
Cutting, Fitting, and Attaching Trim Pieces
Proper techniques ensure clean joints and a professional appearance:
- Cutting: Use sharp blades and secure materials during cuts. For irregular angles, measure and transfer angles accurately.
- Fitting: Dry-fit pieces to verify fit, adjusting as needed before attaching.
- Fastening: Use finish nails or brad nails, driving them just below the surface. For added support, consider corner blocks or internal reinforcement.
Achieving Seamless and Precise Finishes
Seamless joints and smooth surfaces require attention to detail:
- Joints: Miter corners meticulously, applying wood glue and clamps for tight fits.
- Sanding: Smooth rough edges and joints with fine-grit sandpaper. Feather out edges for seamless transitions.
- Filling: Use wood filler or spackle to conceal nail holes and gaps. Sand after drying for a polished look.
Finishing Techniques for a Professional Look
Sanding, Filling, and Smoothing Surfaces
Finishing touches are key to a flawless appearance:
- Sand thoroughly after installation to remove splinters, uneven surfaces, and filler remnants.
- Use block or detail sanders for corners and detailed mouldings.
- Clean surfaces of dust before painting or staining to ensure adhesion.
Paints, Stains, and Sealants for Final Touches
Choose finishes that match your design intent:
- Painters: Apply primer first for better adhesion, then two coats of paint or stain as needed. Use high-quality brushes, rollers, or sprayers.
- Stains and Sealants: For natural wood, stain enhances grain, followed by a clear coat to protect. Use oil-based or water-based products based on project needs.
- Sealants: Sealers prolong the life of finish trim and prevent damage from moisture, UV, or wear.
Tips for a Durable and Flawless Finish
- Avoid over-brushing; multiple thin coats produce the best result.
- Allow sufficient drying time between coats.
- Use painter’s tape to protect walls and floors.
- Inspect finished trim in different lighting conditions to catch imperfections.
Maintenance and Repair of Finish Trim
Cleaning and Upkeep for Longevity
Regular maintenance preserves the beauty and function of your finish trim:
- Dust with a soft cloth or vacuum with brush attachment weekly.
- Clean lightly with a damp cloth and mild detergent for stubborn dirt.
- Avoid harsh chemicals that may damage finishes or wood surfaces.
Common Repairs and When to Refinish
Over time, finish trim may need repairs due to damage or wear:
- Scratches or dings can often be touched up with matching stain or paint.
- Re-caoting or re-staining may be necessary for high-traffic areas or damaged finishes.
- Severe cracks, warping, or structural damage may require replacement of affected trim pieces.
Upgrading Your Finish Trim for a Fresh Look
If your existing trim appears outdated or damaged beyond repair, consider upgrading with new profiles or materials. This process can significantly enhance your room’s style and resale value, with minimal disruption when performed by professionals.